Drawing your floor plan
What this covers
Drawing your room once, so Live View can show you a picture of it. You need the floor plan feature and permission to manage tables (Owner or Manager).
Find it at Property Settings → Floorplan Editor
(/settings/floorplan). Set aside half an hour. Use a computer or a tablet — it works on
a phone but you will not enjoy it.
Before you start
Add your tables first, in Property Settings → Tables. The editor arranges tables you already have; it is not where you create them. See Managing your tables.
The idea
You are drawing a simple plan view of the room — walls, doors, the bar — and then dragging your tables onto it. It does not need to be architecturally accurate. It needs to be recognisable enough that a server glancing at it knows which corner you mean.
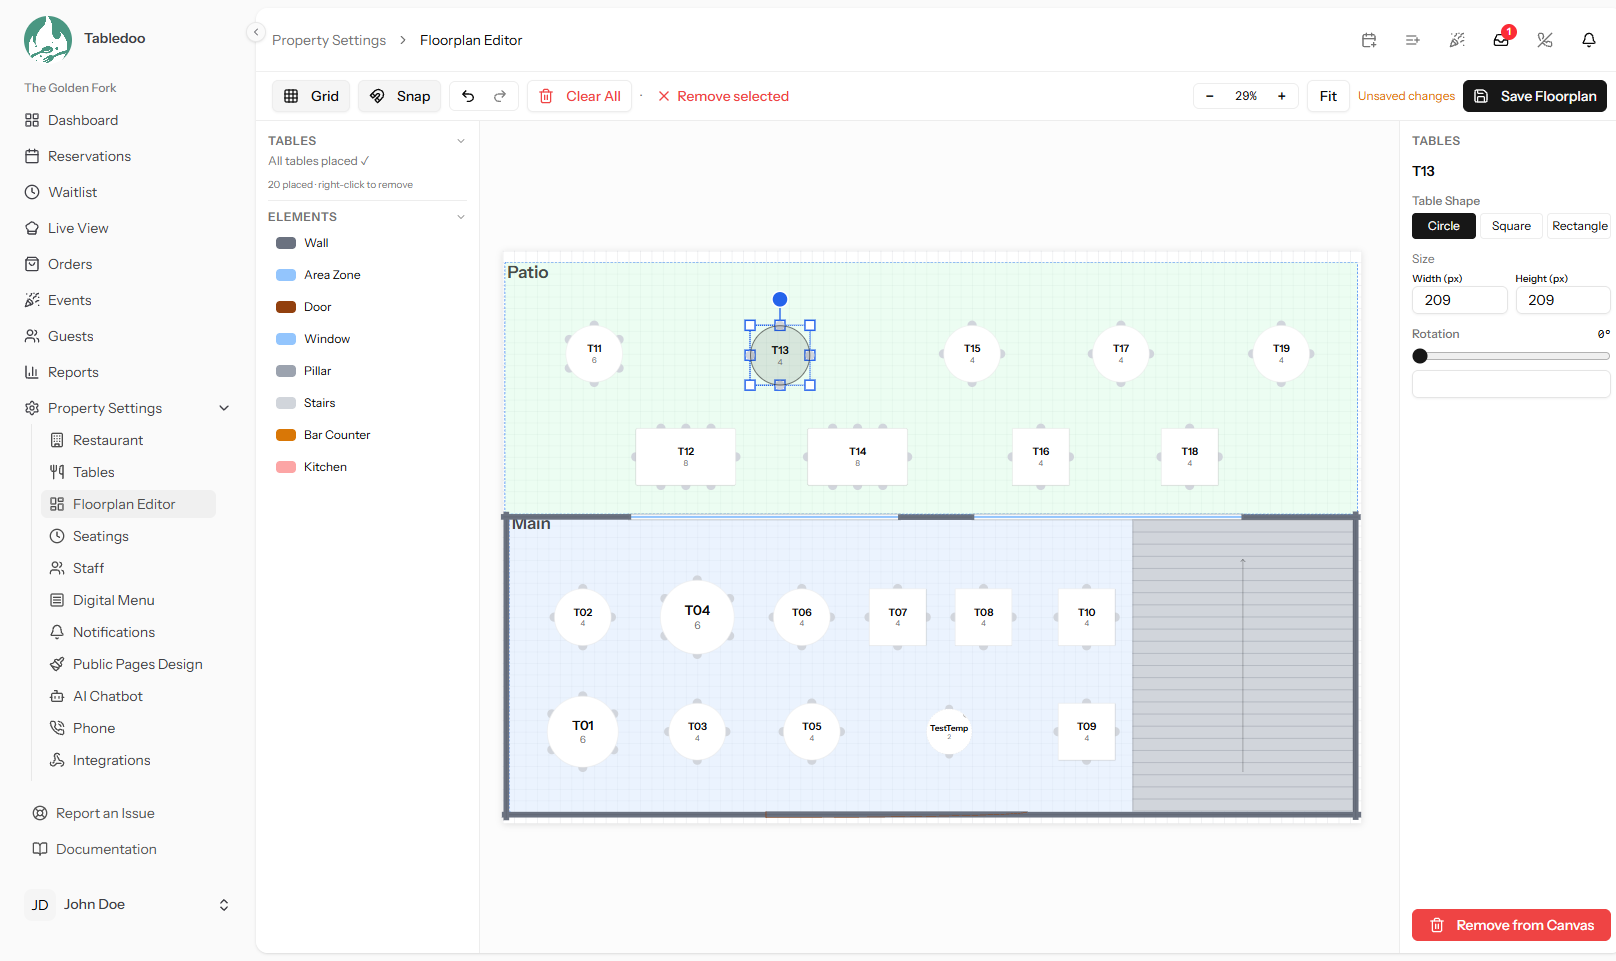
The floor plan editor.
What you can place
| Element | Use it for |
|---|---|
| Wall | The outline of the room and any internal walls. |
| Area Zone | A labelled region — Terrace, Conservatory, Upstairs. Gives the plan a sense of place. |
| Door and Window | Orientation. The entrance especially — it is how people read the plan. |
| Pillar | Columns you cannot seat next to. |
| Stairs | Level changes. |
| Bar Counter | The bar. |
| Kitchen | The kitchen or pass. |
Drawing a wall
Walls are drawn point to point rather than dragged as boxes, so they can follow a real room's shape. Click to add each corner, then double-click or press Enter to finish, or click back on your first point to close the shape. Esc cancels. Afterwards, drag the wall to move the whole thing, or drag a single point to reshape it.
Placing your tables
Drag each table to where it stands in the room. Selecting a table lets you set its size, rotation and shape on the plan — a long rectangle for a banquette, a circle for a round six-top. This is purely how it is drawn; the table's real name, capacity and section come from the Tables screen.
The tools
- Grid and Snap — keep things aligned instead of very slightly crooked. Leave Snap on while you rough the room out.
- Zoom in, Zoom out and Fit to screen.
- Canvas Width and Canvas Height — the size of your drawing area. Enlarge it if you run out of room.
- Remove selected removes one element; Clear All empties the canvas. Clear All does not touch your tables themselves.
- Unsaved changes appears whenever there is work you have not saved.
Saving — and why this is also your default layout
Press Save Layout. Two things happen: the plan is saved, and Tabledoo records where every table is sitting as your default layout — the arrangement you can return to after a night of moving furniture around.
There is no separate "save as default" button; saving the full editor is saving the default. Until you have saved here at least once, the quick editor on Live View stays locked, because it would have nothing to restore to. See Saving and restoring your default layout.
A practical order to work in
- Draw the outer walls.
- Add the entrance, the bar and the kitchen — the landmarks people navigate by.
- Add Area Zones for any named parts of the room.
- Drag the tables into place.
- Adjust each table's shape and rotation.
- Save, then open Live View in floor-plan mode and see whether it reads correctly.
Good to know
- Sections still come from the Tables screen. An Area Zone labels a region on the drawing; it does not change which section a table belongs to. Set that on the table itself. See Sections.
- Nothing here affects bookings. The plan is how the room is drawn. Capacity and availability come from your tables.
- Revisit it when the room changes, not before.