Reading the Timeline
What this covers
How to read the Timeline, which shows your whole day as one picture instead of a list. It is the screen managers use to plan a service.
The Timeline is part of some plans only. If you cannot see it, see Plans, features and limits. You also need permission to view bookings, which every role has.
How the grid is laid out
- Down the left — every one of your tables, grouped by the section it is in. Tables with no section are grouped under Main Area.
- Across the top — the time of day in half-hour columns, covering your service day for the date you are looking at.
- In the middle — one coloured block per booking. The block starts where the booking starts and is as wide as the booking is long, so a two-hour booking is twice the width of a one-hour one.
That width is the whole point of the screen. A list tells you what time people arrive; the Timeline shows you how long they are staying, which is what actually determines whether you can fit anyone else in.
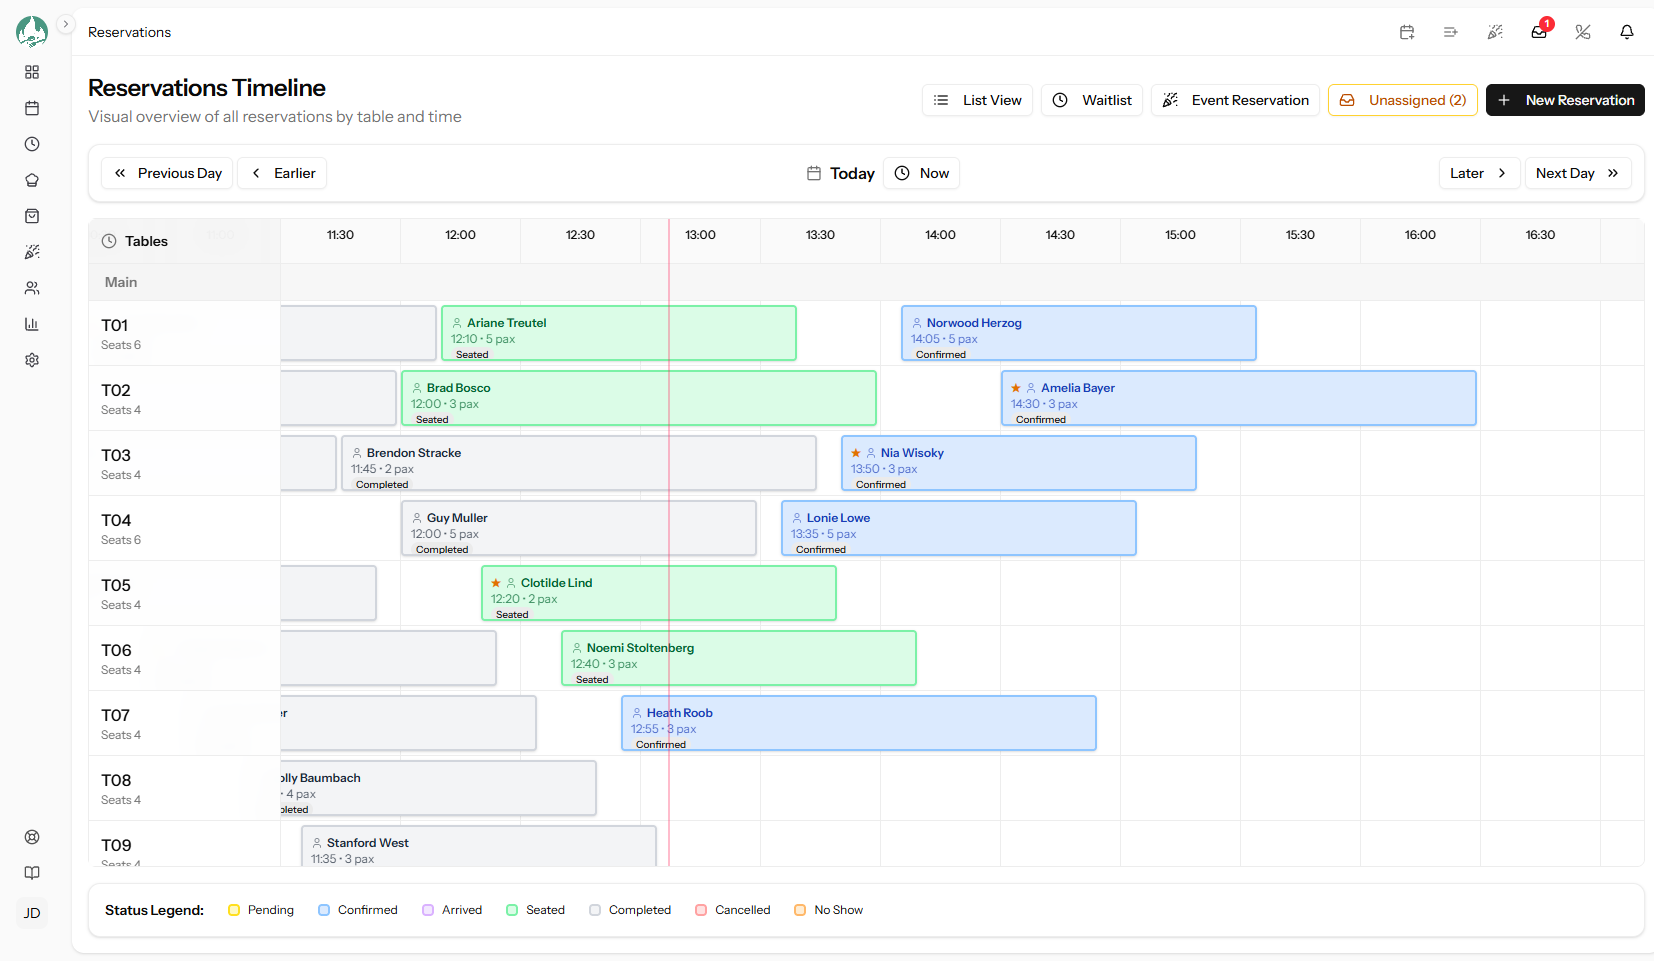
The Timeline.
The colours
Each block is coloured by the booking's status. There is a Status Legend on the screen itself, so you never have to memorise this:
| Colour | Status |
|---|---|
| Yellow | Pending — nobody has checked it yet |
| Blue | Confirmed — the table is being held |
| Purple | Arrived — the guests are in the building |
| Green | Seated — they are at the table |
| Grey | Completed — they have left |
| Red | Cancelled |
| Orange | No Show |
What each status means is in The reservation lifecycle.
The marks on a block
- A gold star — the guest is marked as a VIP.
- A small globe — the booking came from your public booking page. A person icon means it was taken by your staff.
- The guest's name and time, and the number of guests.
- "Merged with…" — this booking uses more than one table. The block spans all the joined rows so you can see the party is sitting across them, and the other tables show a muted band rather than looking free. See Merging tables for a large party.
Bands across the grid
Two kinds of band can appear behind your bookings:
- Event bands — a published event blocks the tables it uses, shown as a band with how many places have sold, for example 18/24. At a glance you can see that Friday's tasting menu has taken the whole terrace. See What the Events module is for.
- Seating bands — if that day uses named service windows, each window is marked and labelled, so you can see your first and second sittings. See Rolling slots versus fixed seatings.
The "now" line, and moving around
- When you are looking at today, a line marks the current time and the grid scrolls itself there when the screen opens, so you start where you are working. The line follows your restaurant's own time zone, so it is right even if your laptop is set to somewhere else.
- Now jumps back to the current time whenever you have scrolled away.
- Earlier and Next move the view a couple of hours at a time.
- Previous Day, Next Day and the date picker move between days. Today brings you back.
The Unassigned button
If any booking that day has no table yet, a button appears in the toolbar reading Unassigned (3). Clear it before service — it takes a minute and is where the evening's only real surprises hide. See Unassigned bookings and the assignment tray.
If the grid is empty
If you see No Tables Found, you have not added your tables yet — the Timeline is built from them. See Managing your tables.